
❈ ❈ ❈ ❈ ❈ ❈ ❈ ❈ ❈ ❈
Thanks for visiting my page! Here is a written guide with photos on How To Start a Hat from the Top!

To begin all you will need is a crochet hook and some yarn. I'll be going over the basic structure of a hat from the top.
There are several different ways you can start your hat. It will be a circle turning into a hat. So, I have a few techniques you can use to start:
Magic Ring tutorial here! Chain 4 method here! Slip Stitch method here!
I'm using the Double Crochet Stitch (DC), tutorial here, for my example stitches!
❈ ❈ ❈ ❈ ❈ ❈ ❈ ❈ ❈ ❈

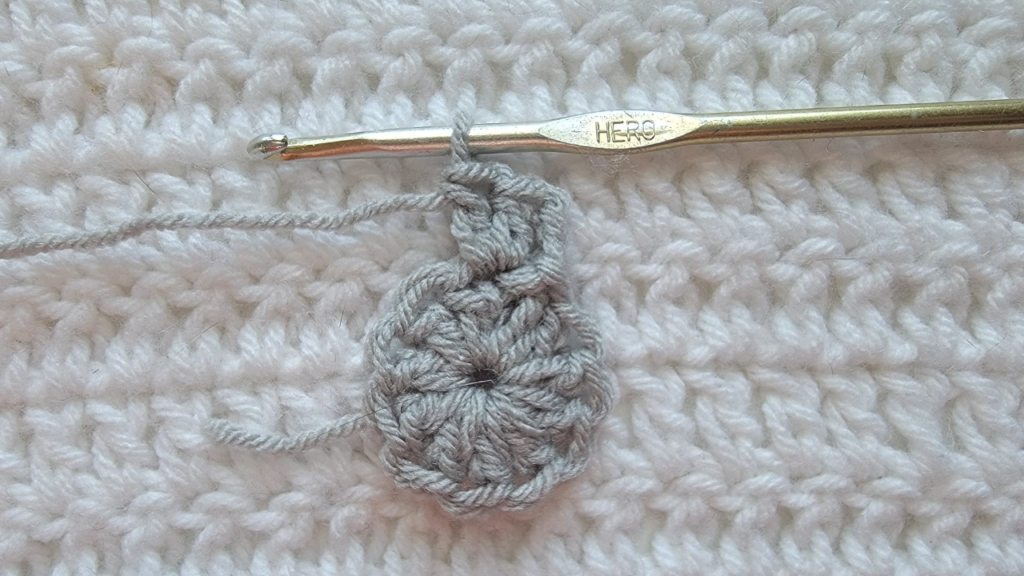
I'll be using the Chain 4 method for my example hat, so I have made 4 CHs

Row 1 is where you can start making your own changes. I made 10 DC into the 4th CH from my hook for my example 1st row. But you could make more, less, make a different stitch, etc. This is going to be your foundation row.
Use the Slip Stitch, tutorial here, to join your STs together with the 1st one made in each row

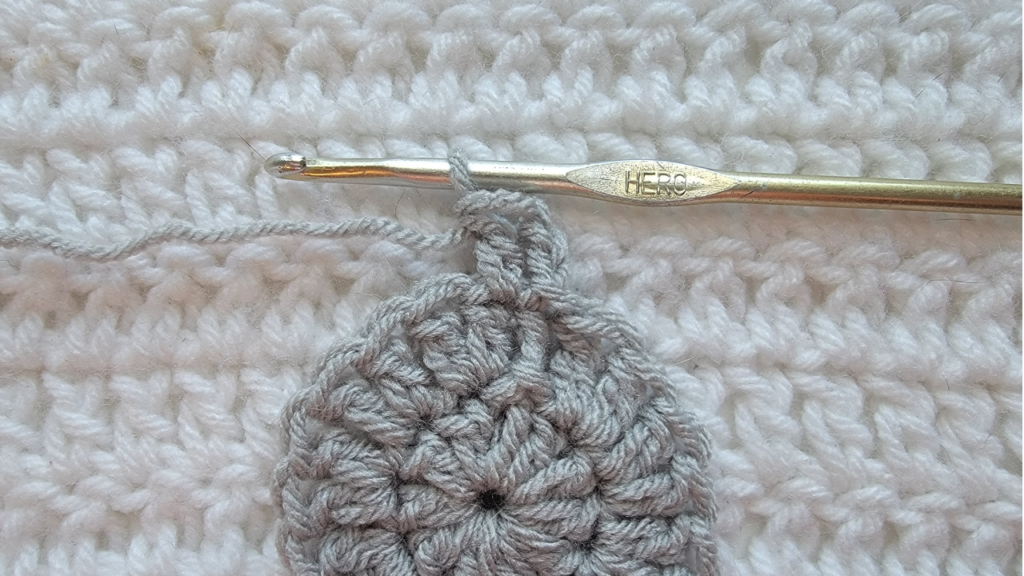
Row 2: Make as many CHs to start depending on what ST you use, I made 2


This is your Increase row. You'll make 2 STs into each ST around. So for my example row I made 2 DC into each ST
Then again, use the Slip Stitch, tutorial here, to join your STs together with the 1st one made in each row

Row 3/Width Rows: Make as many CHs to start depending on what ST you use, I made 2
Make 1 ST into the 1st ST of your row

*Into next ST make 2 STs together (Increase)

Into next ST, make 1 ST

Repeat the steps above from * around, making a increase then just 1 ST next
So now you would make as many Width rows as needed for the circumference of your head, etc.
So this row I just made was 1 ST, 2 STs together, 1 ST, 2 STs together, etc. around
The next row you'd add 1, so you'd make:
1 ST, 1 ST, 2 STs together, 1 ST, 1 ST, 2 STs together, etc.
Then for any future rows you'd add 1 ST between your 2 ST increases

Once you make as many Width rows that you need, you'll start making Body rows
Body rows are 1 ST each into each ST round
You would then make as many Body rows you want for however long you want your hat

Then you can end on a Body row or you could add a Ribbed Band to finish your hat
Here is a playlist featuring Ribbed Stitches to pick from here!
❈ ❈ ❈ ❈ ❈ ❈ ❈ ❈ ❈ ❈
❈ ❈ ❈ ❈ ❈ ❈ ❈ ❈ ❈ ❈

Check out this playlist featuring more Beginner Tutorials here!
❈ ❈ ❈ ❈ ❈ ❈ ❈ ❈ ❈ ❈
Here are some unique crochet stitches to check out:
Slip Stitch Back Loop Join, tutorial here!
How to Start A Hat From The Bottom, tutorial here!
The Magic Knot, tutorial here!
❈ ❈ ❈ ❈ ❈ ❈ ❈ ❈ ❈ ❈
You can find video tutorials from me here!
More crochet patterns from me here!
& photo tutorials from me here! 💗
You can follow me on all social media @crochetmelovely!
Also, like & subscribe to my Youtube Channel to see more videos from me!
Don't forget to sign up for the CML email list to get notifications whenever I upload new content! Located at the very bottom of my home page!
❈ ❈ ❈ ❈ ❈ ❈ ❈ ❈ ❈ ❈