
❈ ❈ ❈ ❈ ❈ ❈ ❈ ❈ ❈ ❈
![]()
Thanks for visiting my page! Here is a written tutorial with photos on how to make my Four Corners Granny Blanket!
This blanket is made from 4 big granny squares joined together! Enjoy!
First, with any project you'll need a crochet hook and yarn. Any yarn or hook will do for learning this blanket
For this tutorial you'll need to know how to make Chains (CH), I have a tutorial here! How to make the Slip Stitch (SL ST), tutorial here! How to make the Double Crochet Stitch (DC), tutorial here!
❈ ❈ ❈ ❈ ❈ ❈ ❈ ❈ ❈ ❈
This blanket is made from 4 big Granny Squares joined together. Lets start with the Granny Square tutorial:

Row 1: Make your circle, then make 3 CHs
I'm using the CH 4 method, so the CH farthest from my hook will be my 'circle space'

Make 2 DC into your circle space

*Make 2 CHs
These CH 2 spaces will be the corners

Make 3 DC into same circle space

Repeat the steps above from * around, until you have 4 sets of 3 DC for each side and 4 corner CH 2 spaces

SL ST into beginning CHs to complete your row
Fasten Off your yarn, tutorial here!

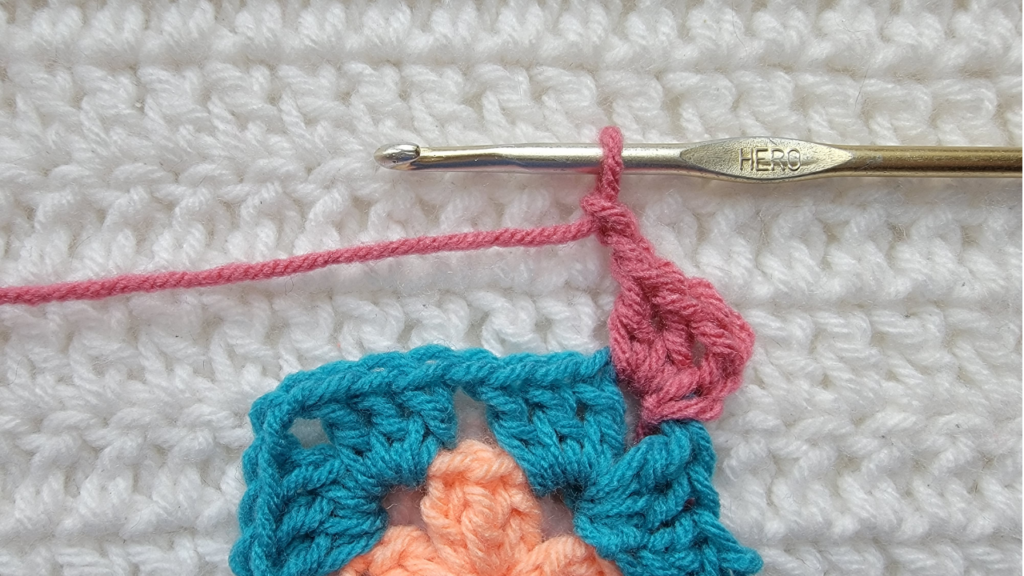
Row 2: Attach new color to corner space, make 3 CHs (these CHs count as 1 DC)

2 DC into same corner space

*Make 2 CHs

Make 3 DC into same corner space

Make 1 CH

Skip over previous 3 DC block, into next corner space make 3 DC

Repeat the steps above from * around, until you have 3 DC + CH 2 + 3 DC into each corner and 1 open space on each side

SL ST into beginning CHs to complete your row
Fasten Off your yarn, tutorial here!

Row 3: Attach new color to corner space, make 3 CHs (these CHs count as 1 DC)

Make 2 DC into same corner space
*Make 2 CHs

Make 3 DC into same corner space

Make 1 CH

Skip previous 3 DC, make 3 DC into next previous open side space

Make 1 CH

Skip previous 3 DC, make 3 DC into next corner open space

Repeat the steps above from * around, until you have 3 DC + CH 2 + 3 DC into each corner and 3 DC into each open side space

SL ST into beginning CHs to complete your row
Fasten Off your yarn, tutorial here!
You can now see how the pattern will repeat. In each open space on any side you will do 3 DC. In-between any 3 DC on the sides you will CH 1 to skip over previous 3 DC blocks. In each corner space you will make 3 DC, CH 2, 3 DC into the same corner space.
Repeat Row 3 for how big you want your squares


So we will make 4 squares, I made 19 rows for each of my example squares for a throw size

Then we will join these squares together using the Join As You Go Method:
Video tutorial here!
Step by step photo tutorial here!
Once you have joined your squares together, made 1 Row around the whole blanket to even out the sides/joins. You would repeat Row 3 from our Granny Square tutorial above


This is what my Four Corners Granny Blanket should look like when completed!
❈ ❈ ❈ ❈ ❈ ❈ ❈ ❈ ❈ ❈
❈ ❈ ❈ ❈ ❈ ❈ ❈ ❈ ❈ ❈

❈ ❈ ❈ ❈ ❈ ❈ ❈ ❈ ❈ ❈
Check out this playlist featuring more Blanket tutorials here!
Here are some more unique stitches to check out:
Single Crochet Rib Stitch, tutorial here!
Scallop Stitch, tutorial here!
Staggered Half Double Crochet Stitch, tutorial here!
You can find video tutorials from me here!
More crochet patterns from me here!
& photo tutorials from me here! 💗
You can follow me on all social media @crochetmelovely!
Also, like & subscribe to my Youtube Channel to see more videos from me!
Don’t forget to sign up for the CML email list to get notifications whenever I upload new content! Located at the very bottom of my home page!
❈ ❈ ❈ ❈ ❈ ❈ ❈ ❈ ❈ ❈